
Usine Hollyhock II is definitely under the radar, although I’m not too sure why. It’s not new software by any means, the original version called Usine launched in 2006 undergoing version changes up to v5 in 2010. Hollyhock launched towards the end of 2012 with Hollyhock II launched in March 2015.
Currently the launch price is up to 60% off. There is only one product but the price depends on your utilisation. If you’re a professional user (defined as making money with Usine) then a lifetime licence costs 229 euros. If you are a student, teacher or non-professional user (defined as not making money with Usine) then a new licence costs 69 euros which includes a year of updates and then 49 euros for a subsequent year of updates.
Usine Hollyhock II is lightweight and uses a portable install meaning you can take it anywhere or even have different install locations for different live sets.
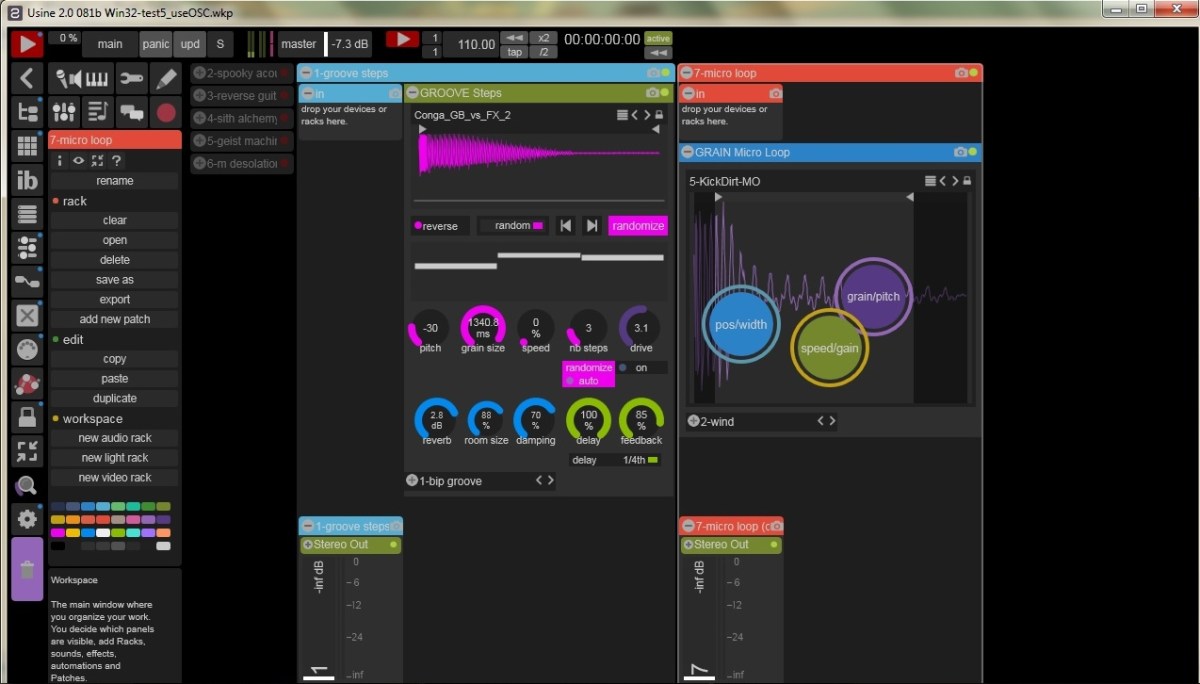
Bear in mind Hollyhock II is not a traditional DAW. In essence it still does everything that a traditional DAW does and a lot more besides, it just does it differently. The workspace is the total environment. Racks are like tracks or channels and patches sit within a rack and it’s where your VSTs, samples, effects etc are loaded. Modules are the smallest part of a patch and can be a delay, filter etc. connected with wires. Hollyhock II has a modular nature which gives amazing flexibility and options. It’s an intuitive process, reminds me of electronics where each module looks like an integrated circuit with pins for inputs and outputs which you drag from one to another to connect with a wire.
Scanning VSTs is a fairly quick process, it crashed twice in the process however. First impressions are very good, the UI looks excellent, a sleek and modern look and feel. Hollyhock II very helpfully comes with example templates and demos to get you started and the user manual is excellent too and a must read.
In a rack you set the input device i.e. audio, midi, external instrument or another rack; the outputs i.e. stereo out or another rack and load your patches i.e. synths, effects. You can position racks exactly where you want them or minimise them to make the workspace tidier.
I find the racks and patches concept really easy to get to grips with and it’s a straightforward process to set up your inputs and outputs. Hollyhock II has a very good range of built in effects (delays, reverb, EQ, distortion, compressors etc) and processors (groove machines, grain processors, loopers) which you can use for a large part of your project. In fact, Invisible Boundaries uses all internal processors and effects, only using VSTs on the master channel to provide a basic EQ and compression.
I really like the flexibility provided by patches. If you typically use a stock delay, you tend to get what you get. Not with Hollyhock II, you have control over the inputs, outputs, delay and feedback. This means that you can choose whether you have knobs or faders for controlling delay and feedback; there’s a ‘random data’ option which allows you to experiment with synchronisation or use some physics to automate control of certain parameters. Once created you can save for future use.

It feels different to other DAWS, I find that most traditional DAWS concentrate your focus on the timing and sequencer grid. Hollyhock II doesn’t do this, instead the focus is on the racks and more specifically the patches they contain. It feels like the instrument / synth, sounds and effects are at the heart and it’s more about crafting and manipulating sounds and the overall performance. And this is to be expected considering the software was developed by Olivier Sens, himself a talented performing musician.
What’s so great is that the software grows with you. By this I mean the process I followed was to set up a couple of racks with samples, one of which used the granular sampler, the other a normal sampler with a delay. I then added automation, edited the patch to include a knob for delay / feedback parameters, added automation to these parameters and then controlled them live during the recording. It allows you to be as simple or complex as you want to be and gives you massive flexibility to set up and control parameters as you wish.
To create a song, you need to display the grid. This is where you drag your racks onto separate lines and sections and change the duration to suit i.e. time or bar lengths. You can play once and put in a break ; play once or repeat a number of times and continue to the next one or loop the section. You can apply automation curves and specify steps when they are played for instance for a reverse mode. This is a fairly non-linear process but I soon got the hang of how it works.
If you’re using Hollyhock II for a live set you can specify several workspaces to create a playlist.
Another powerful function is the interface builder which provides a clean layout space where it is useful to see only the minimum controls needed for a performance.
The physics engine is also worth a special mention. It is a brilliant idea to give automation with an element of randomness. For instance you can set up a cross fade sampler with a ring mod effect and use a ball bouncing around a box using the changing x and y positions to control ring mod parameters.
And this is the beauty of Hollyhock II for me. You could force it to work like a conventional DAW but this would be hard work and why would you want to? It really encourages you to push the boundaries and experiment with your creativity. For someone who likes to manipulate and mangle sound, this is a very intuitive piece of software that enables you to do this easily and include all manner of automation and control that a conventional DAW simply cannot do as easily.
You don’t have to necessarily use it for live performance, you could as easily set it up for live recording. I’ve recorded a couple of live albums and if you like doing this Hollyhock II is a brilliant choice. Even if you don’t want to manipulate parameters live you can still set up workspaces with automation and record songs that won’t sound like anything you’d record in other DAW software. That’s where Invisible Boundaries came from, I really enjoyed exploring the provided processes and the live performance aspects that a 7 track album resulted.
One very notable difference is the way Hollyhock II handles audio files or samples. In many DAWS you simply drag and drop the sample onto a track / channel and add effects or route as you see fit. In Hollyhock II you have to load the audio file into a sampler. There are 5 in total – normal; grain; midi; joggle; cross fade loop. These give an amazing variety of options and control over the sound and I really like this approach, it quickly feels natural.
The normal sampler has common modifiers such as pitch, gain, reversal and quantisation options. The grain sampler is really powerful, a granular engine with size, duration, speed syncronisation, manual percentage adjustment, shaping grains etc.
The midi sampler allows you to set up key-to-pitch playback so you can have multi-layered samples to create a full instrument or drum kit.
The joggle sampler has one fader to interact with the speed and direction of the sample. This is useful to play a sample forwards or backwards and control how fast the playback speed responds.
The cross fade sampler allows you to create a smooth loop from a portion of an audio file placed between 2 markers.
With the samplers, once you’ve loaded one into a patch its possible to load more samples into the same instance of the sampler and then switch between them whilst the workspace is playing. You can also use this process to clear current sample lists then load new lists and save them as individual lists you can use later and also save presets. Using multiple samples is a great way to keep the same effects for subtle differences in sounds. If you use a cross fade sampler, for instance, the loop settings are the same for all samples and any changes will be applied universally. This makes sense and in any case it’s easy enough to load another instance into an additional rack to use different loop points and copy the effects.
The samplers handle audio files really well, adjusting for tempo and looping pretty seamlessly. Some files need a bit more attention with the loop points to ensure that you don’t get clicks.
Another big difference is recording your project. In Mulab for instance, I’ve often used a lot of delays and processor heavy effects they have overloaded the CPU. However, recording to audio always works perfectly.
With Hollyhock II the audio recorder works in the background like a tape recorder whilst your workspace is playing. And this makes a lot of sense because it is designed as a performance tool. It is very flexible though because like a traditional DAW you can record individual tracks as stems so you can record either wet or dry if you wish or alternatively record the whole project via the stereo out.
I found it a little tricky to start because some of the looping samples were playing depending on the grid section I was working on. It took a little while but the answer is simple – turn off the audio engine using the button in the top left. This means you can get everything ready and nothing plays until you’re ready to record, just another example of working differently.
The big advantage to implementing recording this way is it makes live recording very easy and this can be as complex or simple as you choose. For instance you could record your workspace with little interaction when you’ve set it all up beforehand with automation or alternatively edit settings on the fly and play a synth or bass part live for instance.
I’ve often said that I need a better controller with more knobs. One feature that could save you a lot of money – and my ethos for making music is always that it doesn’t have to be expensive – is to use OSC. There are apps that allow you to control Hollyhock II over WiFi. At home this is brilliant, bear in mind for a live performance you better make sure you make provisions for that WiFi connection. There are a couple of apps, Touch DAW and TouchOSC are two examples. A skim read of reviews suggested that TouchOSC was easier to set up and since the manual contains basic instructions I opted for this one.
At £3.99 it’s about the price of a pint. Or a large coffee. Now I’m sure many would prefer a hardware controller but for such a low price it gives you control options with sliders, knobs and xy pads that you might not otherwise have unless you spend upwards of 20x that amount. There’s a few default layouts provided and also a handy layout designer tool is available from Hexler’s website.
Never has something setup so easily. You enable OSC in Hollyhock II settings and type the IP address of your computer into the settings in the app. Then type the outgoing port settings from the app into the computer. Select show OSC messages, move a fader and you’ll see that it’s working – all within 20 seconds. However, you will need to allow the IP address through your firewall or you’ll be scratching your head thinking these things never work.
It’s very easy to set up and use, I’ve right clicked the knob I want to control, clicked the learn option, moved the corresponding knob on the touch OSC app and you’re good to go. I’ve found changing the range to 0..1 seems to give better results. It works seemlessly and it’s very impressive that you can change so many parameters markedly without any noticeable glitches in the sound which I’ve experienced in traditional DAWs. Creating layouts is also an iterative process, for instance I’m finding that templates of the various processors I want to control work really well although I keep finding I just need a couple of extra buttons which are easy enough to update. The templates can also be sent wirelessly to your tablet too which is really easy to do.
A tip here is this principle works for VSTs that don’t support midi learn, you simply drag the knob or fader you want to control from the VST into the patch editor window to create an inlet / outlet. Drag a wire from this to an empty space and you can assign a knob or fader.
I’ve really enjoyed learning to use Hollyhock II for this review. I’d normally include a demo track or demo sounds but instead I’ve created a 7 track album embedded at the top of this post. These tracks are not perfect by any means but hopefully they help to highlight some of the potential of Hollyhock II. They are experimental to a certain extent, the sound processing and automation options really encourage this approach. I love the groove machines, it’s exactly what I’ve been looking for and not found anywhere else. I’m also looking forward to using some favourite VSTs like Polygon (Glitchmachines) and B Step sequencer (Monoplugs) in Hollyhock II controlled with TouchOSC in a live performances to further explore their combined potential.

