
Monique is a monophonic subtractive synthesiser designed to create bass and lead sounds.
So it seems the best place to start this review with how it sounds – Excellent. It has a powerful sound and can create some pretty aggressive bass and lead sounds. A good example of the sort of sounds it can produce is the demo song embedded above. I created this using Monique for all sounds apart from the drums, some sounds were processed with Incipit by Inear Display and others by Spaceship Delay by Musical Entropy.
An example of individual sounds is the Monoplugs video below which showcases some of the presets and is embedded below:
Although Monique comes with a range of presets, it’s not one of those synths with which you can tend to rely solely on the presets because there’s so much more to Monique than that. It really excels at sound design and encouraging you to tweak various parameters to get the best out of it. The oscillators and filters are only a start – the envelope controls, automation and modulation all shape the sound and the effects, especially EQ, also refine the sound further. Not to mention the arpeggiator, loop function and morph mode. There’s something really satisfying about a synth that requires you to put the effort in to reap the rewards, especially when it has an intuitive GUI and not too steep a learning curve so it shouldn’t take you too long to get to grips with it.
I really like the look of the GUI. First appearances may give the impression that it’s complex but in practice it is well laid out and easy to navigate. It has a freely scalable multi-touch interface to avoid the use of menus. A number of themes are available and you can also design your own colour scheme. There has also been quite a lot of development since the original release including layout changes, revamped arpeggiator and a sub-poly mode.

The manual refers to all controls as sliders for consistency which I’ve replicated in this review. It’s important to point this out because a key concept of Monique is the use of dual purpose sliders (called backsliders) to combine similar parameters with the button beneath acting as a switch. You can switch these on with the shift button in the top left part of the display and this is shown in the picture below. Next to shift is the CTRL button and when you enable this mode all parameters are visible.

Monique’s sound engine is basically 3 oscillators, 3 filters, an EQ bank comprising 7 resonant based filters and a few effects but it offers much, much more than this.

The first oscillator is the master and has a phase shift control and a range from -24 to +24 semitones. The waveforms are sine-square, square-saw and saw-noise (white). The graphic on the slider shows the current wave which can be built/ morphed out of these pure waveforms or combinations between 2 successive waveforms. It has a key-sync (K-sync) option which forces a new wave cycle which is useful for percussive sounds.
Oscillators 2 and 3 have the same waveform controls with a tune option and sync controls. You can also modulate the tuning or phase with an LFO by enabling the MOD-L button.
Each oscillator can be shaped by an FM oscillator (a shapeable sine wave oscillator combined with an LFO) which has tune and swing settings with the shape control as the backslider of the osc tune slider.
There’s a very handy oscilloscope display which you can switch on to show the resulting waveform.

The filter section comprises of 3 filters but there’s a lot more to the filters than this and it’s definitely worth getting to know this section in more detail. They act more like a 3 x 3 set of filters because each filter has an input from each oscillator and these are mixed into one stereo track at each filter output.
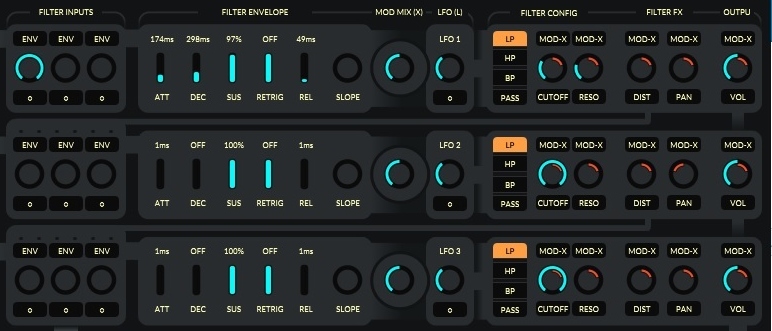
Filter 1 takes the input from osc 1, 2 & 3 whereas filter 2 can take the output from filter 1 or output from the oscillators directly. Filter 3 can take output from filter 2 or output from the oscillators directly. This means that you can create a large number of serial/parallel routings giving an excellent range of sound shaping possibilities.
There are standard envelope ADSR controls with an additional retrigger and slope control. There are choices of low pass, high pass, band pass filters and a bypass option with the usual cutoff and resonance with a handy distortion and pan control too.
An excellent feature of the filters is the ability to create a ‘modulation mix’ which is a signal mixed from an envelope curve and an LFO which can be used to automate cut-off, resonance, distortion, pan and volume settings. To do this you need to turn on the modulation button (MOD-X) above the parameter slider. The backslider is then used to set the maximum amount by which the modulation mix changes the modulated parameter.
The mod mix slider is used to define the amount of envelope curve and LFO in the modulation mix. On the absolute left only the envelope curve is used; on the absolute right the LFO and in the middle is a 50:50 split.
You can take automation a step further by also automating the filter inputs. The principal is the same the button on top of the input turns on automation.
The amp envelope is placed after the filter output and has the standard ADSR controls as a shape control.
The EQ bank and FX bank occupy the same space on the screen and you use a button to select between them.

The EQ bank is a 7 band filter 0 2.6kHz which can by bypassed using the mix control slider. The backslider of mix can be used to control resonance of all filters. Furthermore, all band gains have their own envelopes which are automatable. The EQ shouldn’t be overlooked as it can really help define your sound.
The order of effects is pre-determined and cannot be changed. The effects are distortion, chorus, delay, looper and reverb.

On the subject of envelopes, we’ve already covered that the controls are the standard ADSR by with additional parameters of retrigger and shape. The retrigger timer starts after reaching the sustain level and can create a pulsing effect. The shape control is a neat addition which allows you to define the slope of the curve.
All the envelopes work in the same way although there is no retrigger option in the amp envelope because this should be done with note on and/or note off. If you edit an envelope in a pop up you get a preview screen where you can adjust envelope parameters. They are always time based (milliseconds). Conversely LFOs are always sync’d to note duration from 16/1 – 1/64. They have wave, speed and offset controls.
The arpeggiator is a sixteen step sequencer split into 4×4 beat groups. You enable each step by clicking on the required button and you can use the backslider to adjust the note offset (in semitones from root note) and velocity. There are also shuffle, offset and sync controls.

One really cool feature of monique is the morph mixer. This basically has 4 morph mixers, one of which mixes between osc values from 2 presets, one mixes between filter values from 2 presets, one mixes between arpeggiator values from 2 presets and the fourth mixes between eq / fx values from 2 presets. I don’t think you can edit these settings directly but you can always create your own presets with required settings for these specific parameters. Alternatively there is an option to ‘set to current’ which can be used to reset values at the minimum setting and then you can turn the morph slider to 100 and make the required adjustments to filter input, eq / fx etc and use the morph slider to mix between these values. It is also possible to use an LFO to automate certain morph parameters. There is also a drag pad which can be used instead of the morph sliders which has a smooth control.

Another cool feature is the loop function. This can be found in the fx section next to the delay and is enabled by using the fill button. It works like a delay and the signal in the buffer is overdubbed each time. This means that if the release setting is 100 it will loop indefinitely but if the release setting is 50% then the next time it is written in the buffer it will be at half power, the next time 25% and so on. The size setting by default is 1:1 which writes in all four bars of the buffer at the same time. If you set it to 2/1 you will only write in every second buffer and 4/1 will only write in one of the four bars of the buffer. You can use this to make your pattern more interesting than a one-bar loop. I used this towards the end of the demo song.
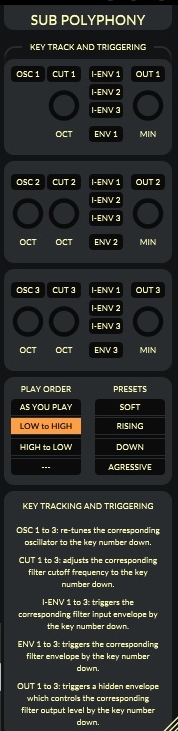
Monique also has a sub poly mode, this works by retuning the oscillators rather than using multiple voices to save CPU power and retain the monophonic principles. The poly button towards the top right opens the dialog box where you can enable osc key tracking then change the tuning of the oscillators to create a chord and you can alter the note order which can give different effects depending on your settings. You can also change the cut-off key tracking. There are also options for filter input, filter output and filter envelope triggering.
Monique is a very capable synth. I can see that the monophonic nature may be off-putting to some but it certainly shouldn’t be because Monique has some unique characteristics and can produce some excellent aggressive bass and lead sounds. The sub-poly mode also goes someway to counteract this. The filters, automation and morph mixer really make Monique stand out from other synths and enable you to create great movement and evolving sounds. The arpeggiator is also a very useful addition for bass or lead sounds.
Monique is available from Monoplugs priced at $99. Should you want to try it out, a demo version is also available. It’s fully functioning but has no skinning support and a periodic returning noise.

